In this post you’ll learn how to record the screen of your Mac with terminal using FFMPEG.
FFMPEG is able to use avfoundation (the audio and video library) to access webcams, audio devices and to record the screen. FFMPEG doesn’t do this automatically so finding out the correct device from the supported list must be found. This is possible with the following script:
$ ffmpeg -f avfoundation -list_devices true -i ""The output for a 2018 MacBook Pro shows the following:
[AVFoundation input device @ 0x7fcfcbc08d40] AVFoundation video devices:
[AVFoundation input device @ 0x7fcfcbc08d40] [0] FaceTime HD Camera (Built-in)
[AVFoundation input device @ 0x7fcfcbc08d40] [1] Capture screen 0
[AVFoundation input device @ 0x7fcfcbc08d40] AVFoundation audio devices:
[AVFoundation input device @ 0x7fcfcbc08d40] [0] iShowU Audio Capture
[AVFoundation input device @ 0x7fcfcbc08d40] [1] Built-in Microphone
Under the AVFoundation video devices the second index shows “[1] Capture screen 0”, index 1 is where we can access the screen capture capabilities. Luckily the FFMPEG script is quite simple but since the list may differ from computer to computer here’s the script idea
$ ffmpeg -f avfoundation -i "<screen device index>:<audio device index>" output.mkvNote: a screen resolution and frame rate must be set before setting the input, else an error will prevent the recording from starting.
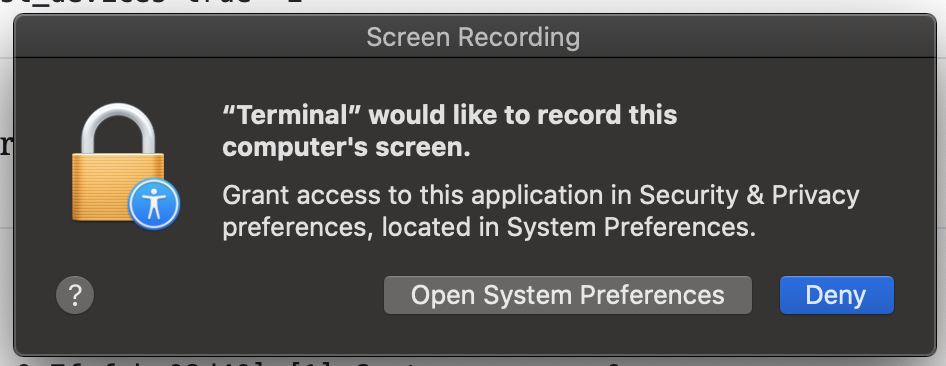
If you run this command, MacOS security will ask if you’d like to give permission to record the desktop from terminal. This requires you to allow terminal under the privacy -> screen recording option.

If you allow terminal to record the desktop, terminal will require a reboot which System Preferences recommends.
For my computer the desktop and microphone are one index 1. Here’s what the working script for my MacBook Pro looked like:
$ ffmpeg -f avfoundation -r 30 -s 1280x720 -i "1:1" output.mkvYou may wish to set a time length or use control+c to stop the recording.
If you wish to add real time filters to the output, -filter_complex is available. For example here’s a script to change the hue randomly:
$ ffmpeg -f avfoundation -r 30 -s 1280x720 -i "1:1" -vf "hue=H=2*PI*t:s=cos(2*PI*t)+10" output.mkv
Love FFmpeg? Grab a copy of FFmpeg For Beginners on Kindle or Paperback to learn over 120 ways to master FFmpeg!