(FFmpeg) How to trim ‘x’ seconds from the end of an audio track?

Note: Trimming at this point should be easily understood but for a refresher refer to answers in How to trim ‘x’ seconds from the start of an audio track?

Trimming a couple of seconds off the end of a track is easy but again requires a different thinking of how time works in FFMPEG. Like trimming from the start of an audio track, trimming from the end of a track uses the argument -t or duration with no seeking.

In this example, the input file is 1 minute long with the requirement of 10 seconds removed from the end:

  $ ffmpeg -t 00:00:50 -i input.mp3 -async 1 output.mp3   

By setting a smaller time than the actual audio duration, FFMPEG will automatically trim the audio. Now the benefit of manually setting the duration instead of FFMPEG automatically handling it is understandable.

Love FFmpeg? Grab a copy of FFmpeg For Beginners on Kindle or Paperback to learn over 120 ways to master FFmpeg!

buy now on amazon

(FFmpeg) How to trim ‘x’ seconds from the start of an audio track?

Here we’ll use an input file with a 1 minute duration with a 5 second introduction of silence. To remove that silence, it’s important to identify these two numbers because trimming requires tricky subtraction. Let’s look at the example below:

$ ffmpeg -ss 00:00:10 -i input.mp3 -t 00:01:00 -async 1 output.mp3   

-ss is used to seek to a part in the audio and -t is the duration of the playback. So 1 minute duration audio subtracted by 10 seconds seeking results in the first 10 seconds being removed.

A major setback with trimming is manually setting the audio duration value. Luckily, FFMPEG has a tool called ffprobe which can be used to give you exact duration:

$ ffprobe -i input.mp3 -show_entries format=duration -v quiet -of csv="p=0" -sexagesimal

Note: “How to Use FFMPEG in bash Language?” for ideas on how to use this output as a variable and dynamically set -t the advanced FFMPEG programming.

Love FFmpeg? Grab a copy of FFmpeg For Beginners on Kindle or Paperback to learn over 120 ways to master FFmpeg!
buy now on amazon

(FFmpeg) How to record a MacOS Screen with terminal?

In this post you’ll learn how to record the screen of your Mac with terminal using FFMPEG.

FFMPEG is able to use avfoundation (the audio and video library) to access webcams, audio devices and to record the screen. FFMPEG doesn’t do this automatically so finding out the correct device from the supported list must be found. This is possible with the following script:

$ ffmpeg -f avfoundation -list_devices true -i ""

The output for a 2018 MacBook Pro shows the following:

[AVFoundation input device @ 0x7fcfcbc08d40] AVFoundation video devices:
[AVFoundation input device @ 0x7fcfcbc08d40] [0] FaceTime HD Camera (Built-in)
[AVFoundation input device @ 0x7fcfcbc08d40] [1] Capture screen 0
[AVFoundation input device @ 0x7fcfcbc08d40] AVFoundation audio devices:
[AVFoundation input device @ 0x7fcfcbc08d40] [0] iShowU Audio Capture
[AVFoundation input device @ 0x7fcfcbc08d40] [1] Built-in Microphone

Under the AVFoundation video devices the second index shows “[1] Capture screen 0”, index 1 is where we can access the screen capture capabilities. Luckily the FFMPEG script is quite simple but since the list may differ from computer to computer here’s the script idea

$ ffmpeg -f avfoundation -i "<screen device index>:<audio device index>" output.mkv

Note: a screen resolution and frame rate must be set before setting the input, else an error will prevent the recording from starting.

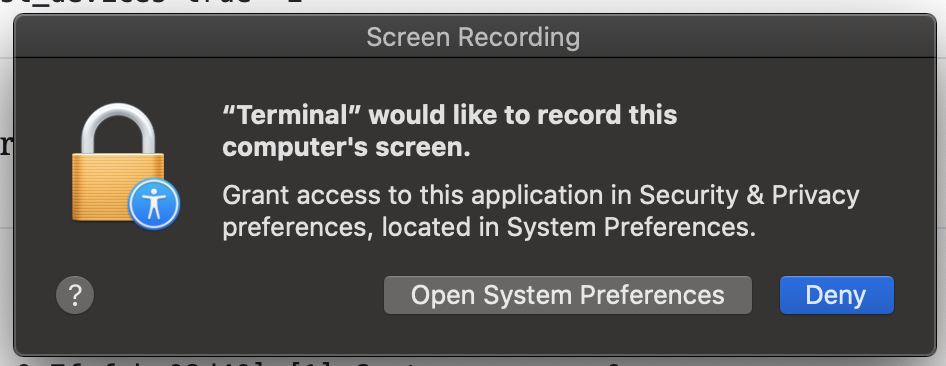
permission popup to record screen

If you run this command, MacOS security will ask if you’d like to give permission to record the desktop from terminal. This requires you to allow terminal under the privacy -> screen recording option.

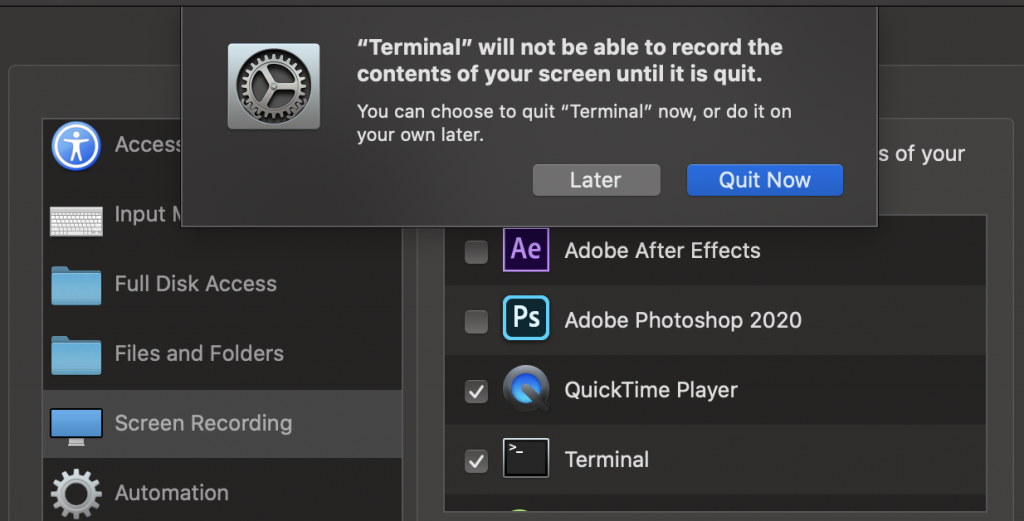
System preferences request terminal to quit

If you allow terminal to record the desktop, terminal will require a reboot which System Preferences recommends.

For my computer the desktop and microphone are one index 1. Here’s what the working script for my MacBook Pro looked like:

$ ffmpeg -f avfoundation -r 30 -s 1280x720 -i "1:1"  output.mkv

You may wish to set a time length or use control+c to stop the recording.

If you wish to add real time filters to the output, -filter_complex is available. For example here’s a script to change the hue randomly:

$ ffmpeg -f avfoundation -r 30 -s 1280x720 -i "1:1" -vf "hue=H=2*PI*t:s=cos(2*PI*t)+10" output.mkv

Love FFmpeg? Grab a copy of FFmpeg For Beginners on Kindle or Paperback to learn over 120 ways to master FFmpeg!
buy now on amazon

(FFmpeg) How to merge multiple mp3s into one track?

Merging audio with FFMPEG is one of the most searched questions on the internet and couldn’t be any easier. The only difference is a txt file with a list of mp3 tracks must be made before the merging can begin. Below is an example list inside the file “file.txt”:

file 'track1.mp3'
file 'track2.mp3'
file 'track3.mp3'

Next, using the following FFMPEG one-liner, all 3 mp3 files can be merged into one long track:

  $ ffmpeg -f concat -i file.txt -c copy full.mp3   

concat or concatenate, is the process of combining media files. In this example, exactly the same codec and parameters are required for joining. 

In this example, ffmpeg lacks a specific media file as an input but a list from a external list (file.txt), this -f is used to “force” and input file.

NOTE: this will work for any audio or video format.

concat
	Indicates the argument that combines multiple media files
-f 
	Indicates the forces an input or output

Love FFmpeg? Grab a copy of FFmpeg For Beginners on Kindle or Paperback to learn over 120 ways to master FFmpeg!

buy now on amazon

(FFmpeg) How to convert wav to mp3?

WAV is probably the most common audio format next to MP3. The WAV format has been developed and maintained by Microsoft and IBM since its initial release in 1991. wav files are known for their large file size due to its uncompressed audio but high quality format.

 $ ffmpeg -i input.wav -ab 320k output.mp3 

The -ab here is audio bitrate. The higher the value the better the audio quality but it will result in a large file.

Converting one audio file to another is simple and convenient but a powerful tool. There are even people on http://fiverr.com (a quick gig freelancing website) who have had 100s of jobs solely on the basis of converting one audio file to another. You too now have that ability.

Want to sign up to Fiverr? Feel free to use my referral code and “Earn Up To $100”* in credit: http://www.fiverr.com/s2/6229935ae0

Other conversions you might be interested in:

Love FFmpeg? Grab a copy of FFmpeg For Beginners on Kindle or Paperback to learn over 120 ways to master FFmpeg!

buy now on amazon

(FFmpeg) How to convert FLAC to mp3?

FLAC (Free Lossless Audio Codec) is another free audio codec and container that is known for it’s lossless audio quality. Oddly enough, FLAC is also maintained and developed by the xiph.org foundation. Other than FLACs inconvenience of player support, audiophiles consider FLAC to be one of the best formats for it’s Hi-Res audio.

Although this might be a superior audio quality for some, mp3 is just more convenient and thus converting a FLAC to mp3 is as follows:

 $ ffmpeg -i input.flac -ab 320k output.mp3  

In this example, the introduction of -ab or bitrate can be noted. The higher the bitrate the higher the quality but larger the file.

Note: this conversion will automatically keep metadata (FFMPEG 3.2 +)

Looking to convert an OGG to MP3? Check out this article.

Love FFmpeg? Grab a copy of FFmpeg For Beginners on Kindle or Paperback to learn over 120 ways to master FFmpeg!

buy now on amazon

(FFmpeg) How to convert ogg to mp3?

ogg is an open container format by the xiph.org foundation with no restrictions of software patents. ogg does have a higher quality of audio at smaller file sizes but not commonly supported on physical devices natively (MP3 players, iPhone, etc). 

Fortunately, ogg to mp3 is a standard and easy conversion. With audio to audio conversions setting -acodec maybe redundant as seen below:

$ ffmpeg -i input.ogg output.mp3  

Note: if an mp3 codec is required add -acodec libmp3lame

Love FFmpeg? Grab a copy of FFmpeg For Beginners on Kindle or Paperback to learn over 120 ways to master FFmpeg!

buy now on amazon

(FFmpeg) How to extract audio from a video?

At times, you may have a video that you wish to extract the audio from. This is easily done by simply converting the video into an audio format. For example:

 $ ffmpeg -i input.mp4 -vn -acodec copy output.mp3 

A new argument -vn (no video) is used to ensure the encoded mp3 is only an audio file. FFMPEG is smart enough that this argument is optional in most cases. Here we also copy the input audio codec and use the same one in the output mp3.

If for any reason a conversion of a video to audio format results in a broken mp3, setting the mp3 codec to libmp3lame may fix the issue.

 $ ffmpeg -i input.mp4 -vn -acodec libmp3lame output.mp3 

FFMPEG does support just about any audio format you required including WAV, AIFF, FLAC, ALAC, ACC, WMA, etc. For a full list check out these other articles:

Love FFmpeg? Grab a copy of FFmpeg For Beginners on Kindle or Paperback to learn over 120 ways to master FFmpeg!

buy now on amazon

(FFmpeg) How to convert an entire directory/folder?

Before getting into learning how to use all the amazing and powerful filters, let’s learn one more useful trick; converting an entire directory. Whether it’s to convert an entire folder or apply a filter to multiple files, cycling through files is bound to come up in any workflow.  

In the example below, this one-liner will convert all wav files in a folder to mp3:

 $ for i in *.wav; do ffmpeg -i "$i" "${i%.*}.mp3"; done  

Note: This will keep a copy of the wav files while additionally adding new mp3 files to the same folder.

In this example, this one-line will convert all mov files in a folder to mp4:

 $ for i in *.mov; do ffmpeg -i "$i" "${i%.*}.mp4"; done  

Pretty easy eh? What about adding a filter that every video should have. In this example adding a hue to make every video black and white:

$ for i in *.mov; do ffmpeg -i "$i" -filter_complex "hue=s=0" "${i%.}.mp4"; done

If a one-line isn’t what you require, a bash script can easily be adapted:

for i in *.mov; do 
  ffmpeg -i "$i" -filter_complex "hug=s=0" "${i%.}.mp4";
done

Love FFmpeg? Grab a copy of FFmpeg For Beginners on Kindle or Paperback to learn over 120 ways to master FFmpeg!

buy now on amazon

What is map in FFmpeg? Map explained

The -map functionality is an advanced feature that allows the user to select specific input audio or video that is sent to the output. In addition, virtual streams can be created to apply complex manipulations which can be accessed with -map. 

Normally, a map isn’t required to set an output as the result audio and video is known:

 $ ffmpeg -i input.mp4 output.mp4 

In examples where multiple inputs are available, the use of -map is specific on what the output will include. In this example, the video (v) from input1.mp4 (index 0) is selected for output while the audio (a) from input2.mp4 (index 1) is selected for output:

 $ ffmpeg -i input1.mp4 -i input2.mp4 -map 0:v -map 1:a -shortest output.mp4 

In the case of two inputs with a filter, the syntax is a little different. In this example, the output will have the video input1.mp4 and the audio from input2.mp4 with a volume increase of 10dB for the output result:

 $ ffmpeg -i input1.mp4 -i input2.mp4 -filter_complex "[1:a]volume=10dB[new_audio]" -map 0:v -map [new_audio]:a -shortest output.mp4 

The volume filter is applied to [1:a], the audio in input2.mp4, and a new virtual stream, [new_audio], must be created for -map to set the new audio in the output. Accessing the audio from [new_audio] follows the same pattern with the [new_audio]:a.

If an input has multiple audio sources as seen in MKV files, the access to a specific audio channel syntax would be as seen below:

 $ ffmpeg -i input.mkv -map 0:v -map 0:a:1 output.mp4 

In addition to virtual streams being created, the virtual stream can also have a filter applied to it through chaining. For example, with the same concept as the last example except this time, the [new_audio] has a reverse filter applied:

 $ ffmpeg -i input1.mp4 -i input2.mp4 -filter_complex "[1:a]volume=50dB[new_audio]; [new_audio]areverse[reversed_audio]" -map 0:v -map [reversed_audio]:a -shortest output.mp4 

A new audio stream, [reversed_audio], is created and set for the output. The final results being video from input1.mp4 with audio from input2.mp4 with 10dB higher volume and reverse is now complete. 

The syntax of -map accesses to a stream’s audio and video is very similar to dictionaries in the Swift programming language. A dictionary has a key and value, [key:value], and in FFMPEG the key is the index/name while the value is either audio or video.

Note: If the output requires video and audio both must be mapped.

Love FFmpeg? Grab a copy of FFmpeg For Beginners on Kindle or Paperback to learn over 120 ways to master FFmpeg!

buy now on amazon